

Hi everyone! I hope you’re ready for a really fun and totally easy way to make over any piece of furniture!
As you can probably decipher from my title, today I’m going to show you just how easy it is to use chalk paint. I was a little apprehensive at first, as I always am when it comes to refinishing anything. I’m not the best at home decor renovations, but I’m definitely living proof that literally anyone can do chalk paint! As a matter of fact, the less perfect you are with this the better!

If you follow me on Instagram you probably already know that I’ve replace my old counter height black finish kitchen table, with this new regular height vintage beachy table.

For those of you wondering, it’s not really vintage. Shh…it’s from American Furniture Warehouse. And no, this isn’t a sponsored post for them, or for the chalk paint!
I also had four black bar stools that adorned my kitchen island. I immediately realized that they didn’t quite “go” with my new lighter beach theme very well.
Enter chalk paint.
Today I’m going to show you how I took my beat up black bar stools, and turned them into pretty vintage white barstools with just a little paint. In this video we’ll cover how to apply chalk paint, how to apply the wax, and how to distress an finish your piece! So keep reading to see what supplies you’ll need, then check out my video below to see how to complete your project!

Supplies:
So to begin you’ll need just a few simple supplies…
- Chalk Paint (I’m using Annie Sloan, but you can get chalk paint at local hardware stores too!)
- Wax (Clear or dark depending on the look you want.)
- Chalk Paint Brush (Go for one with natural bristles. They grab paint better and give better coverage.)
- Wax Brush (Yes, you’ll want a separate brush for your wax)
- Lint free towel (I am using an old dish drying cloth.)
- Sand paper (I like 220 for finer sanding, and 100 for rougher places.)
The Annie Sloan paint is definitely more expensive, and since I was new to the process and I was a little worried that I would ruin my furniture if I used something cheaper. But after doing this project, I’ve talked to several people who have used other brands of chalk paint and still had wonderful results! So I would go with what fits your color needs and your budget.
I found a local retailer near me that sells this specific paint. There are a TON of different colors, and they have samples of how to create different looks. So if you have a retailer near you where you can go and look at samples, I highly recommend it. You don’t have to purchase their paint, but it’s a great place to get ideas of what look you prefer and how to achieve that look before starting.
Let’s get started!
Okay, now that you’re ready, watch this Chalk Painting 101 video tutorial to get started!
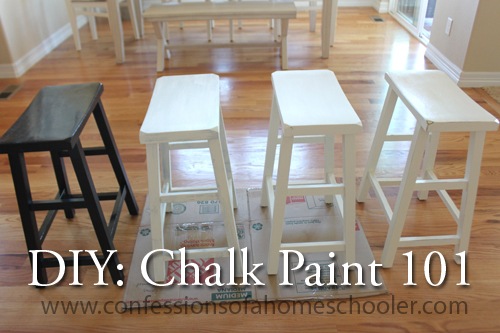
Here is a photo of the progression of my project.
- Original black: As you can see the original black stool on the left. It’s kind of beat up after years of use.
- 1 coat of paint: As you can see there is a little bit of black showing through in areas where I didn’t get as good of coverage. Some people like this look, and choose to stop at one coat. It’s totally up to you.
- 2 coats of paint: The black is completely covered, non peaking through at all. I went that route, so that I could control my distressing more.
- Finished stool: And the final stool shows a completed chair with wax. I’m hoping you can tell in the photo that the last chair has a really nice sheen to it. And it definitely has a vintage vibe going on which I love.

Here’s an up-close image of my stool after one coat of wax and a little distressing. As you can see there are a few nicks in the top of the stool. If you don’t want those to show through your paint, just fill them with a little wood filler prior to painting.
No mistakes!
Oh, and I almost forgot to mention the best part! If for some reason you really feel like you messed up or don’t like the color, you can just paint right over the top of your project again, and change it to something you like better! If your paint is too thick for your liking, you can also just sand it down until you’re happy with the results. There’s really no way to mess this up!

And the best part is you can use chalk paint to paint over just about anything! Wood, metal, fabric (yes, fabric!) and just about anything else you have! If you don’t believe me, just search “chalk paint” on pinterest and you’ll find a ton of great ideas and inspiration!
Here is my finished stool. I totally love the results! They definitely give a vintage worn look to the stools, and I think they match my new kitchen theme really well too!

I hope you enjoyed this tutorial! As you can see chalk paint is really easy and super forgiving! I hope you enjoyed this tutorial and that it inspires you to try a little re-decorating!
And as always if you’re inspired to try this technique yourself, make sure to post your photos and tag me on social media so I can see what you all create! I love seeing your projects!
Happy painting!
Disclosure: This is not a sponsored post.
What *is* chalk paint? Why would one choose it over another kind of paint for furniture? Looks good, btw 🙂
Hi, Dana, Chalk paint is Annie Sloan brand paint which is used specially in furniture to bring a chalky appearance. However you will find other branded chalk paints. Thanks to Erica for such an insightful post on chalk paint.
You can also use chalk paint inside your house without the fumes:)