

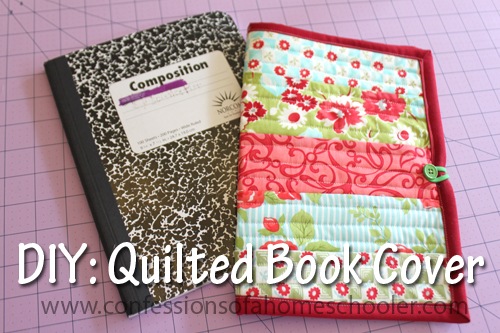
Hi! I have another fun quilting tutorial for you today! We’ll be making this cute quilt-as-you-go book cover from start to finish. It’s also super beginner friendly, teaches basic quilt-as-you-go techniques including binding!

This is a really fun project to help make some of those less than attractive school books much more fun to look at! And it’s also a great beginning quilting tutorial as well.
You’ll learn how to baste and quilt your book cover, as well as how to sew on binding and even how to sew on a simple button closure. If you don’t want to do the button and elastic closure, you can skip that part. Instead you might consider adding a ribbon to tie your book closed! Just tie the ribbon around the book cover and adjust it to where you want it. Then pin it along the book’s binded edge. Then untie the ribbon and take it to your sewing machine, and just stitch along the book binding edge where you pinned it and voila! You now have a cute ribbon tie to keep your book cover closed.
But let’s get started on this project.

Supplies:
- 11” x 17” Backing fabric**
- 11” x 17” Batting**
- Several scrap fabric strips at least 2” longer than your book cover width.
- 2 – 2.5” x WOF strips for binding (May vary depending on the size of your book. To determine binding, add the measurements for all 4 sides of your quilt piece. Then add 12” to that total to account for corners.)
- 1 Button
- elastic hair tie
- Soft measuring tape
- Scissors
- Spray Basting (I like 505 Temporary Fabric Adhesive)
- Rotary trimmer (I like this one: Olfa Splash 45mm Rotary Cutter)
- Self Healing Cutting Mat (I have a Fiskars 18”x24” light blue mat)
- Clear Acrylic Ruler
- Coordinating thread (I’m using Aurifil 50wt natural white)
- Straight pins (I like glass head straight pins)
- Sewing machine
** If you are measuring for your own book add 1” to the height and 2” to the width of your book so that you will have some leeway in trimming. Trim your finished quilted piece 1/2” larger than the height of your book, and 1.5” wider.
Ready to get started?
Watch my DIY: Quilted Book Cover video tutorial to see how to make this fun project!
I hope you enjoy this tutorial! If you are inspired to create something fun, make sure to post your pics and tag me on social media so I can see what you all create!
- Confessions on YouTube
- Confessions on Instagram
- Confessions on Facebook
- Confessions quilting ideas on Pinterest
Want more information on getting started quilting? Check out my Getting Started series!
Check out my other fun quilting projects here!
This is fabulous! When my kids were younger I made something similar to this – it had a pocket on the inside for a sketch pad, and it had about 12 small pockets for 12 colored pencils. We took them on car trips – they were fabulous. The project you posted above is great, too! Kind of the older kid version of what I made years ago. Thanks for posting this great tutorial – we’ll be trying it soon. (and btw – I love the fabrics you chose!) 🙂
Thanks! I hope you enjoy making it!!
Love this!! Will definitely use this in our classroom! Thanks for sharing!
What a great gift idea for Christmas! I have a 10 almost 11 yr. old daughter who would love one of these! You did a great job on the tutorial explaining each step. I just wondered where do you get all the cute fabric you use in your quilt projects? Thanks so much for sharing your quilting ideas with us. I also homeschool so I have been a blog fan for several years now. Merry Christmas to you & your family 🙂
Do you have the pdf instructions?
I’m sorry, I don’t have a PDF download for this one, but the instructions are in the blog post below and the video.