

Good morning! I hope you are all ready for a home economics lesson today because I’m sharing a tutorial for an easy thread catcher. My girls each made one for their new sewing machines and I made one too!
So what is a thread catcher?
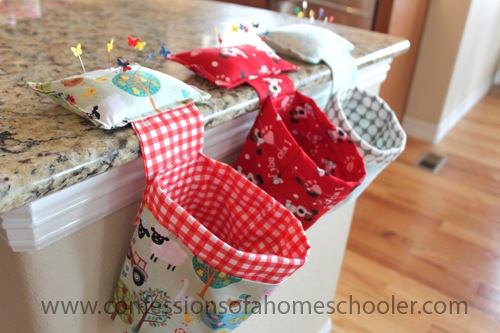
It’s basically a super cute trash can with a weighted pin cushion on top. These hang nicely by your sewing machine and come in very handy when it comes to keeping little pieces of thread, and fabric contained. Plus you can quickly access your pins while sewing too. And who doesn’t need a cute little trashcan in their sewing room?
This post got a tad long, but I wanted to give you as many details as I could. By the way, this is a great project for younger sewers! My girls (9 and 11) each made their own bags. I did cut the fabric for them, but they did the rest all on their own.
Sound like fun? Let’s get started!

Supplies:
-
- –> Download a FREE printable pattern for the Thread Catcher <–
- Pins
- Rotary cutter
- Scissors
- mat and ruler
- sewing machine (Or a needle and thread but who has time for that?)
- Fabric (Fat quarters work nicely, but you’ll need 1- 17.5”x11” of the outside fabric, and 1 full Fat Quarter or 18”x 22” piece of the lining fabric.)
- 1/2” x 18” of any type of stabilizer for the top edge of the bag. I used a cotton belting similar to this one from JoAnn’s, but you can use plastic or anything else you have on hand that will give it some stability.
- Rice, sand, or crushed walnut shells for pillow filling (walnut shells can be purchased at the pet store, they are used for lizard cage bedding.)
All seems are sewn at 1/4” unless otherwise indicated.

Cutting Instructions:
From your outside fabric cut:
-
- 1 – 3.5”x 10” strap piece**
- 1 – 4.5” x 10” pillow piece
- 1 – 17.5” x 8.5” bag outside piece
(**NOTE: The strap in the PDF Pattern size has been updated to make it tad smaller. It is now 3-1/2″ x 6″. You can use whichever size you prefer!)
From your inside lining fabric cut:
-
- 1 – 17.5” x 11” bag lining piece

The Strap:
The first step is to create the strap that holds the pin cushion to the bag. To do this simply fold the strap piece in half length wise with the right sides together, so your piece measures 3.5” x 10”. Sew down both sides using a 1/4” seam. Make sure to leave one end open.
Turn the strap right sides out and push out the corners with a pencil, or your scissor tip. Just be careful not to cut your fabric!

The Pillow:
Next lay the strap you just created on the piece of pillow fabric as shown below. Fold the pillow fabric right sides together in half so it measures 4.5”x 5”.
Adjust the strap so it’s centered on the pillow. Pin all of the layers together. Stitch down both sides, and about a 1/2” in on each end, but make sure to leave an opening in the end so you can turn your pillow right sides out and fill!
When stitching, make sure to catch your strap in the bottom seam (shown below), but fold down your strap so you do NOT stitch your strap in the top seam.

Turn your pillow right side out. It should look like this…

Take a quick minute to press your pillow and strap. We also tucked the pillow opening seam in to make sewing it up a little easier.

If you’d like, do a 1/4” top stitch around the outside of the pillow edge to give it a more finished look. This is a picture of my daughter’s project, I forgot to top stitch my pillow ![]() Again, make sure to leave one end open to fill!
Again, make sure to leave one end open to fill!

Next fill your pillow with either rice, sand, or crushed walnut shells.

Then tuck in your edges and top stitch to close the seam. This is much less noticeable if you top stitch like I did in my daughter’s project shown above. Set your completed pillow and strap aside.

The Bag:
Next pin your lining and outside bag fabric right sides together along the 17.5” sides and pin. Sew together with 1/4” seam.

Press your seam open so that you have a nice edge.

Next turn your project sideways and fold in half like shown below. Pin along the edge and add in the stabilizer for the bag rim so it goes all the way around the project as well. Line it up so it’s just along the seam of the inside lining as shown below and pin in place.

Stitch around all three sides as shown below, making sure to catch the stabilizer in your seam. Trim the stabilizer off even with your bag fabric when done sewing. Make sure to leave about 3” at one end open so you can turn the bag.

Next fold your ends like shown below.

Mark about 1.5” up from each corner tip and sew along your line. This will create a box look on the bottom of your bag. Do this on both tips of your outside and lining fabric.

After you’ve sewn along your line, trim off any excess fabric like below.

Your bag should now be looking like this…

Next turn your bag right side out and stitch up the end seam to finish it off.

Tuck your inside lining down into your bag so it should look something like this, with about an inch of your inside lining showing along the top edge.

Next run a quick top stitch around the edge just to keep the lining and stabilizer strip in place.

The Big Finale:
Adding your strap to your bag is the last step in completing your project! Place your strap along the center back side of your project about 2.5” down and pin it in place.

Just make sure you only pin it to one side of your bag, and not both sides or your bag won’t open when you’re done!

I just stitched a square around the strap and then an “X” inside to make it a little bit more secure.

And that’s it! This project took us about an hour and turned out really cute!
Now go and make some more because they’re fun!

Oh and don’t forget to get some fun pins to add to your cushion. No sewer is complete without a cute set of pins.

Then it’s time to put your new bag to use! Any small scraps, threads, bits, and bobs can go in here.


–> Download a FREE printable pattern for the Thread Catcher <–
I hope you enjoyed this tutorial and happy sewing!
The square areas got me confused. The pictures kind of don’t do justice.
Hi Larissa,
sorry I would watch the video tutorial it will probably be more helpful.
Where is the video tutorial, because I am stuck on the bag section after sewing 3 sides and leaving a gap on where to go from here.
Hi, this is an older post, I have an updated post with a video here: https://www.confessionsofahomeschooler.com/blog/2019/04/ericas-easy-thread-catcher-video-tutorial.html
I can’t get the pattern to download? Is the link broken? Or do you no longer offer this pattern?
Hi Sheila,
The link is still working, try RIGHT clicking the link and then select ‘save file as’ and see if that helps! If you are on a mobile device, some download automatically so you will want to check your downloads folder 🙂
Is there a pattern for the pin cushion pictured with the thread catcher too?
Hi they look so cute and very useful. I’m looking forward to giving them a try I will probably make one for daughter I’m sure she will love it.
Thank you for sharing
Lyn
Hi again. Well I have made one for my daughter, it turned out brilliantly. Thank you so. Happy sewing! Lyn
This is WONDERFUL!! Thank you so much. I sewed my scraps together for all the pieces and I really like the way it turned out. I used an old water jug for the stabilizer because I couldn’t find anything else in the house. Next time I’ll hand stitch it to the seam before I turn it right-side out🙂
This video is very useful to learn how to sew. now by own I am sewing.abogado federal de delitos sexuales
this was an exceptionally nice post. Taking a few minutes and actual effort to produce a good articleÖ but what can I sayÖ I procrastinate a whole lot and don’t seem to get anything done.
Thank you. I put a piece of plastic tubing from the hardware store in mine. I left a hole in the side seam and inserted it into the bag then sewed the strap on. I ran the tubing so that it was in a semi circle and held the bag open. it makes it handy for dropping my clips into as I sew as well as threads. Your girls might want to try a sewing machine pad, they are quick and easy and keep me from picking my scissors off the floor with the front pockets. I also attached a cloth bag to the pad with snaps as an extra catch all.
What a cute project! I was needing one of these very much, so I looked up some ideas and found you. Your instructions about the stabilizer could have been a little clearer but I muddled through and did the best I could. Alas, YAY! I have my very own pincushion/thread basket now that matches my sewing space. Thank you for the pattern and inspiration! Tk