

Hi everyone!
I remember back when we first heard of lapbooks. I was totally confused. I had no clue what a lapbook was, let alone how to make one! Since then we’ve had the pleasure of adding several fun lapbook units to our homeschooling days.

What’s a lapbook?
A lapbook is simply a hands-on learning tool that you can use to enhance any subject you want! Typically a lapbook is constructed of a manilla file folder, then the insides are decorated with fun “mini-books” that include information on your subject.
Lapbooks can be as simple or complex as you like based on the ages of your students. They can include stories, poems, pictures, graphs, artwork, and anything else you can think of!
How do you use a lapbook?
I don’t typically use a lapbook as a primary means of learning, but some are certainly detailed enough that you could. We usually add a lapbook to a unit we’re studying as a supplemental hands-on activity.
So for example when completing one of my Literature Units, your student would read a chapter or two. Then complete the accompanying min-book. Inside they might write some important detail about the chapter, or answer a comprehension question from what they’ve just read.
That said, lapbooks are actually really flexible. You can use them however you like to in your school, there really aren’t many rules when it comes to creating one of these!
Basic Lapbooking Supplies:
- File Folders (We prefer colorful ones)
- Paper & Printer for mini-books
- Scissors
- Glue
- Tape
- Markers, crayons, colored pencils, etc.
Watch a lapbook video tutorial!
Most of you know that we use lapbooks for my Scientists, Artists, Composers, and Classic Literature units. And for the most part they’re all the same basic layout. Since I’ve had so many questions on how to make the lapbook shell for my Unit Studies I thought it would be a good idea to do a video for them.
Watch the video on how to make the Tri-Fold Lapbook with Pocket here! Or continue reading this post for more instructions and photos.
For this lapbook you will need:
- 2 file folders
- A pair of scissors
- Clear shipping tape
Step 1:
Lay your first file folder on the table with the folder open.

Carefully fold in each side in so they meet in the center and crease the sides well. It might help to use scissors or another hard object just to press the sides so they stay closed.

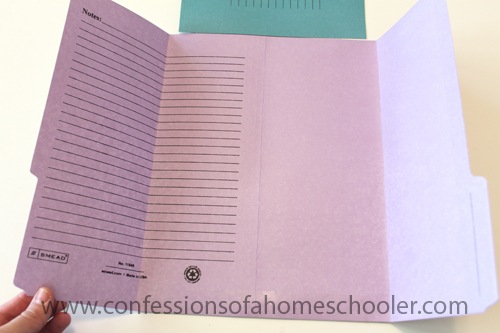
Step 2:
Taking your 2nd file folder, cut it in half along the center line. Then trim off any tabs that might be on your folder so you have a straight edge. Next tape your cut piece to the top of the first folder using shipping tape. (See image below.)

Step 3:
Taking the remaining piece from the one you just cut, cut it in half and trim off any tabs. Next tape the half piece to the backside of your first file folder along the bottom and side edges. Leave the top flap open so you create a pocket to house any reports or other items you might collect during your unit.

And that’s it! you’ve just created a tri-fold lapbook with an inside flap and a back pocket!
Super simple and easy right?
Psst…Now stay tuned because I’ve been working feverishly in the wee hours to complete a whole new set of Classic Literature Units for you! The first one will be coming up on Monday!
For more lapbook tutorials check out this video!
Can’t wait to see what books you picked! We love your literature units!
This is an awesome resource! I love lapbooks.
I am with Amy. I cannot wait to see which books you picked for your new lit. units!
I love this! Great instructional video. Thanks!