We just started using the Sue Patrick Workbox System this year and LOVE it! For those of you who don’t know what it is, its not a curriculum, but an organization system. I’ll do my best to explain it to you, but Sue does a better job on her website, so you can look there for a video demonstration of how to set it up! My setup is a bit different than what Sue Patrick recommends, but I really believe you can modify the system to suit your needs. I recommend her book, it has a lot of great ideas and teaching philosophies as well as a free typing program which we love!
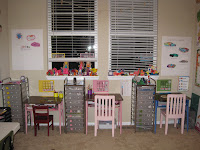
Here’s an overview of how we use our workboxes. I really can’t say enough about the workbox system! Its totally revolutionized how we do school! I can’t imagine trying to organize 3 different grade levels without them! Here’s a photo of what my setup looks like:

Side Note: I have to say I like the workboxes separating the kids, seems to help them focus.
I got these workboxes at JoAnn’s during a 50% off sale, you can also find them at Sam’s club. They are called Smart Place 10 drawer carts.
The Planning:
I use an excel spreadsheet to do my planning. At the end of each week, Thurs or Fri I sit down and go through my teacher’s manuals and fill in the spreadsheet for what will go in boxes during the week. After I put in core work, I fill the boxes that are left over with fun educational games or crafts, and I try to make them go along with what we are doing. This planning part takes an hour sometimes a little more, but the smoothness that it creates for the actual school day makes it well worth the effort.
I have 3 kids doing school now, so each of them get a different color sheet, and the only purpose to that is so I can tell them apart easily. Each week I copy and paste the grid from the previous week into a new sheet in the same excel file, that way all my records are in one place. I print each weeks sheet and store it in a binder to show our lesson plans.
I also print out a copy of the page and tape it to the wall above each student’s desk so its easy for me to see as we’re working, and to fill boxes when we’re done. (If I make any changes during the week, I just pencil it in as I go then update the excel file at the end of the week.) You can Click here to download my workbox planning sheet.

The Setup: Here is how our boxes are setup, they are the same for each child. The benefit for the child here is that they can see exactly what is expected of them for the day. They can see how much they’ve actually completed, how much they have left, and they know exactly when they are done with work. Its really taken away all the whining we had last year about ‘how much left’, ‘when are we done’ etc. And that was just me! LOL!
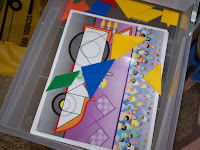
In Action: Each box gets 1 subject in it, and everything needed to complete that project. If its cutting/pasting, include scissors and glue. Pencils, markers, dry-erase markers, erasers, whatever is needed so kids aren’t running around wasting time searching for things! I put a snack in our boxes about half way down just to help with motivation, and usually some thing crafty or fun in the last one. Here are a couple samples of boxes:


They work their boxes in order, no exceptions! (Well, except for my 3 year old, I allow her to pick whatever she feels like doing at the time.) As they work, my kids pull off the number on the box and stick it to the grid pasted on the wall next to their desk. This indicates that box is finished. (Sue Patrick does this part differently, but it wasn’t working for us, so we do it this way.) Any completed work gets turned in on top of the cart. When they get to a card that’s already on their strip, they can take that action, like here you see after 3 boxes she gets a potty break. They rarely take this, but it was an issue last year so I put it on and every now and then I’ll see them take a break. Since I can’t fit a science center, or art project in a box, I put it on this grid, when they get to that card they go to that center. The 3 help buttons on the bottom are for if they need help on a box that doesn’t have a work with mom card. I haven’t really even used these, they just raise their hands if they need help, but they’re in the download if you need them. You can click here to download my schedule strip, numbers, and subject cards. I also made blank number cards so you can add in your own images/theme: Download Blank Number Cards Here.

If there is a box that I know they need help on, or that requires my ‘teaching’ then I put a ‘work with mom’ sticker on it. They know to ask me when they get there. I also try to stagger the ‘work with mom’ boxes between kids so they don’t all need my help at once.
My numbers are just plain because I print them out on colored cardstock, but you can search for workbox numbers on google and find some fun ones! I found these cool designs today at Boys, School and Fun!
We used to pull the drawers all the way out and stack the completed ones on the floor (my son really liked seeing his work disappear from the cart), but once the baby started getting into them, we moved to just taking off the numbers and putting them on the grid on the wall. Again, here’s a big picture of what the setup looks like, and why we don’t put boxes on the floor anymore.

We start our day with Group Time, which includes Prayer, Bible Study, Pledge, Alphabet songs, Days of week, Months of year, and Calendar time. Then we do Poems, and the Science reading together. After all that we move on to our boxes! You can read more about our daily schedule here.
So that’s it, we LOVE LOVE LOVE our boxes, its like Christmas morning everyday for the kids as they run in and look through boxes to see what they have. I don’t have anymore complaining about ‘how much more’ nor do we have “what do I do next mom?” and me saying “Hold on a minute while I finish with your sister”! I really think its made our days smoother and seems to help keep me organized, as well as let the kids know what is expected of them for the day, what they have left, and when they are done. I HIGHLY RECOMMEND using boxes or some sort of system like this. I have seen people with older kids use file folders instead of boxes, you can google on sue patrick workboxes and get TONS of information and blogs with ideas! There is also a Yahoo Workbox group where people share downloads, ideas, help etc.
Please don’t look at this and be overwhelmed, the planning is truly worth the effort and you can adjust the system to make it work for your family as well!
I hope you found this post helpful! Feel free to let me know if you have any questions!
My Workbox Downloads:
- My Schedule Strip, Subject Cards and Number Cards
- Blank Workbox Numbers (with space for you to add your own images)
- Workbox Planning Worksheet
- I Spy Game Card
- Spanish Card
- JumpStart Card


your website is superb
really nice job
what a great article we have here. i believe you must have put too much time and resources to come out with this. thank goodness for this article.
Wow! The workbox sounds so fun for the kids and efficient for mom! Right now i have everything organized by subject lying flat on a shelf. It works but is not as fun and does take more time to separate and distribute amongst my three kids. I’m excited to try this out!
Thanks for sharing! Do you have to get the boxes ready every night or once weekly? How do you teach the lesson plans? For Language and Math there are daily lesson plans. Is that where the mom sticker comes in? 10 subjects or projects a day? Can you elaborate on what a childs day might look like ?
Hi Rachelle,
When they were young I refilled the boxes at the end of each day so they were ready to go for the following day. Now that they’re older, we just leave the workbooks in the drawer and they move on to the next worksheet or whatever on their own.