


You will need:
- Self-healing cutting mat
- Ruler (I have a Fiskars 6’x24” acrylic ruler.)
- Cotton thread in coordinating color, I used white.
- Rotary cutter
- Sharp scissors (I used Fiskars 5” Titanium Micro-tip scissors because I already had them, but Fiskars 8” Softouch Spring Action Rag Quilt Snips are made specifically for rag quilting!)
- 2/3 yd. each of 5 different coordinating fabrics for quilt front
- 1 piece of backing fabric (55″ x 75″)
- 1 piece of fleece for batting (55″ x 75″)
- Sewing machine (Would love some suggestions for a new machine, Mine is about the same age as I am and was my grandma’s Dressmaker!)
My quilt used 35 – 10”x10” squares with a 3/4 “ seam allowance all around. After sewing and washing it ended up being 45” x 59” which fits nicely on her bunk bed. You’re welcome to make your quilt any size you like, just make sure to get the correct amount of fabric for your project!
So let’s get started!
I thought it would be easier to show in a video, but I did my best to describe the process in this post as well!
If the video doesn’t work in your browser, click here to see the DIY Rag Quilt Tutorial video!
Pick out fabrics!
For this project you’ll want to pick out at a minimum, 5 different fabrics for your front side, and 1 fabric for your backside. You’re of course welcome to use more if you like, but to keep a nice blend on the front side, I wouldn’t use less than 5 different fabric patterns.

Trim it!
The next step is to lay your front fabric with the right side out on top of your fleece inside fabric. Next add your back fabric with the right side facing the table on the back of your quilt sandwich as shown in the photos below.

Once your fabric is in the proper position, trim it into 10” x 10” squares cutting through all 3 pieces of fabric at one time. If you have a hard time cutting 3 layers, you can trim them individually then stack them up after, it’s just a little faster if you can trim them all at once.

I highly recommend a rotary cutter for this step as they’re nice and sharp. And they glide nicely along your ruler to give a straighter cut. But since this is a rag quilt, it’s quite forgiving and you’re welcome to use scissors if you wish. Just know that it will take longer, and your hands will probably be tired of cutting when you’re done!
If you purchased 5 different fabrics for the front layer, you’ll want to cut 7 – 10”x10” squares of each of your 5 different fabrics.

Once your pieces are all cut, pin each one in place going through all 3 layers.

Design it!
The next step is to design your quilt! A.k.a. lay it out onto the floor and arrange your squares in an eye pleasing manner. If you’re making one the same size as mine, you’ll want to place 5 square across and 7 squares down for a total of 35 squares.

Next you’ll work along horizontal rows. Starting with the first row, pin each quilt block together with the seams up like shown in the example below.
You’ll then want to stich them together using a 1/2” to 3/4” seam allowance. I went with a 3/4” seam just to give my quilt a fluffier rag finish.
After stitching the 5 blocks in each row together, you’ll want to stitch your completed rows together using the same technique. As you get to each cross seam, make sure to lay the seam out flat (on the front side and backside) to distribute the bulk. I didn’t take a photo of this step, but it is shown clearly in the video tutorial.
Finally, you’ll stitch around the entire outside of our quilt, again laying the seams flat, using the same seam allowance so the border will fray as well.

Cut it!
Once the quilt is all sewn together, the next step is cut up all of your seams. Using very sharp scissors, cut little slits approximately 1/4” all the way along every single seam. Be careful not to cut into the stitching, so stop just before your stitch line.
I used Fiskars 5” Titanium Micro-tip scissors because I already had them, but Fiskars 8” Softouch Spring Action Rag Quilt Snips are also a great choice, and made specifically for this task. I highly recommend the spring touch scissors because it really saves on the hand cramping during this step!
I’m not gonna lie, this took me about 45 minutes to an hour to trim all of the little seams, but I think it’s worth it since the end result is super cute! I just sat back and listened to the Hallmark Christmas movie channel and snipped away!

Wash it!
And finally, you can wash your quilt!
Wash it on cold water and then dry it on a low heat cycle. Do NOT wash in warm or hot water as the heat will cause your soft materials to ball up and lose their soft touch. Make sure to always wash it in cold water to keep the soft fluffy material, well, soft!
And that’s it! This is a super easy project, and it’s great for beginning sewers or quilters. The whole project took me about 3 evenings to complete, and I’m really pleased with the end result. I chose very soft fluffy fabrics, and the fleece lining makes this quilt nice and warm!
The only problem is now I have a wait list at my sewing machine to make more! I guess that’s what happens when you have four children, I can’t ever just make one!
Let me know if you decide to tackle this project, and send me pics I would love to see how they turned out!
PS. If you choose to make these, send me some pics on instagram with #coahchristmas so I can see!
Thank you so much Erica, your tutorials are just great.
You are such a blessing 🙂
Jac x
I saw you were looking for new machine recommendations. There are lots of great brands out there. I have a Janome and LOVE it. I have the quilting addition that has a larger throat space. It is about 10 years old or so and I’ve never had a problem with it. I don’t even want to trade it for something newer. Bernina, Pfaff, Husqvarna are all great brands too. I would highly suggest buying a machine (whether new or used) from a sewing machine repair store or a quilt shop. You will get lots of help and hopefully great customer service. You can go down to walmart and buy a cheap one, but if you are hoping to get a lot of use out of it with little trouble and would like it to last as long as the one you are currently using-buy from a sewing machine shop or quilt shop. You’ll have to post what you end up with! The quilt is very pretty!
Thanks! I ended up going with a Juki, so far so good :o) I haven’t done anything super thick on it yet, but it seems to be a good machine.
Do you know the brand of the pig fabric? My daughter loves pigs, so we are always looking for new pig prints. Very cute quilt!!
Hi Elizabeth,
here’s a link to the fabric: https://www.etsy.com/listing/204606467/baby-pig-quilt-fabric-babes-in-farmland?ref=market
Great job on the video tutorial! I am very inspired to make a rag quilt. Thank you for breaking down the steps for us.
I am a seamstress and have been for over 30 years. I have used several different brands of sewing machines. I just wanted to let you know that each brand has different levels of machines. All the big name brands have great machines. It will be fun for you to try them out in the store if you are able. Think about your needs ahead of time so you don’t get trapped into thinking you need more than you really do. Will you ever want to do machine embroidery? Will you be doing a lot of quilting? It is nice to be able to have some growing room, but not have more than you really need either. Blessings as you find what will be best for you.
I can’t wait to make a rag quilt! Now onto fabric shopping…..
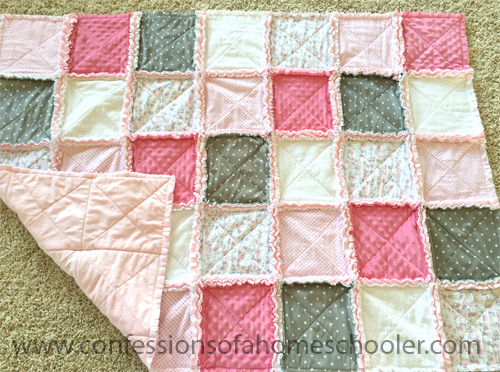
Great tutorial! We love these quilts (my grandmother made quite a few for us over several years) but have never seen just one fabric on the back (ours are all sandwiches with the same fabric on the front and back). Would you mind posting a picture of the back?? Also, I’ve only done one of these but with strips rather than squares (might save some time?)…so fun! Thanks so much!!
Hi Kaitlin,
thanks for the reminder, I forgot my last picture! It’s up on the post now :0)
What kind of material did you use? It looks like flannel and fleece. Just want to make sure I get the right kind. Was the pig material a quilter’s cotton?
The white with pink polka-dots and the pink plaid is flannel. The light pink backside, gray and white polka-dots, and pink bumpy one are minky fabrics (furry), and the pigs are a regular quilting fabric. So it’s kind of a mix!
Did you quilt the X’s on the squares before you sewed each one together or did you quilt the X’s once it was assembled?
If you look in the pictures, the one that has the squares pinned together, they are already quilted so I’m going to go with before assembly.
Thanks Erica for this great gift idea!
Nina,
Yes, you’ll see in the video that i stitched an “X” across each quilt sandwich before assembling them together.
I have 2 quick questions.
1. Did you pre-wash anything or just wash after assembled as you suggested?
2. I saw another tutorial that suggested making the middle batting layer smaller so it would not be in the actual seams. Do you feel that would have been better than making all squares the same size? I am going back and forth in mind as to which would be best.
Thank you for any opinion you have about these questions.
Christine,
I pre-washed the flannel b/c it shrinks, the rest, no. I made the middle batting the same size because I wanted it to look extra fluffy in the ragged part. But if you don’t want to see your middle layer, you can make it smaller :o)
Thank you for the inspiration! I decided to jump in and make a rag quilt this past weekend for my daughter. She wanted it princess themed. I made it a bit bigger than your cute pig quilt and added her name. I will post a pic on Instagram as you suggested if you want to see it. My son is now excited for me to make a super hero themed one for him.
Thank you, again.
~ Christine
My son got bunkbeds for a Christmas present and is now in need of another quilt. Your post inspired me to tackle a boy’s themed rag quilt!
I see you’ve been bitten by the quilting bug! I love it!!! I’m loving your updates on Instagram, too. I have been collecting fabric since I started rowing with FIAR, and just got my squares cut this fall. How do you make time to quilt? You are amazing, Erica!