

Hi everyone! With Easter right around the corner, I thought it would be a perfect time to get our mini resurrection gardens started. It’s always fun when you can add in hands on activities to your homeschool studies.

Creating a simple mini resurrection garden takes only about 20-30 minutes to complete and will provide your kiddos with a lasting memory of the true meaning of Easter!

Mini Resurrection Garden Supplies:
- Shallow potting dish
- Small terracotta pot (2-3”)
- One large rock for the tomb opening
- Potting Soil
- 6 small sticks
- Grass seed
- Hot glue gun, craft glue, or twine for crosses
- Optional: Moss, small rocks, and anything else you’d like to decorate your garden.
How to make your mini resurrection garden instructions:
Um, okay, before you start might I just suggest doing this activity outside? It was kind of windy the day we did it, so we ended up bringing it inside. I used our craft trays to help with the mess, but yeah…grass seed get’s everywhere! Especially when there’s a very thorough Teeny Tot partaking in activities.

Send the kiddos outside to gather some supplies. They will each need one large rock for the tomb opening, 6 small twigs each, and a few decorative rocks and anything else they would like to decorate their garden with.

First gather all of your supplies and have students lay the small terracotta pot on its side in the center of the shallow potting dish.

Giving each one a scoop of soil, help them to mound the potting soil all around and over the top of the center small pot to form a hill.

Sprinkle grass seed all over the dirt area. I was worried when The Teeny Tot got a little overzealous with her seed, but her garden is growing the best, so… they also added grass seed inside so Jesus had a soft bed.

Spray your garden with a water bottle making sure the soil is well moistened. And add the large rock next to the tomb opening, off to one side to show your empty tomb.
Cut twigs to size for the 3 crosses, then help students either hot glue the crosses together, or tie them with craft string to hold in place.

Add the 3 crosses to your garden behind the tomb opening.
Add moss, decorative rocks, and anything else you like to your garden.
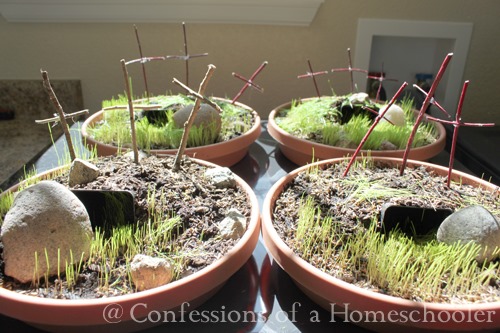
Here are the completed mini resurrection gardens, each one is a little different. You can see how thorough the Teeny tot was with her coverage of grass seed on the green tray below.

Place the garden in a sunny spot in your home and spray daily to keep soil moist.

Our grass started to sprout in about a week, so you’ll want to start your garden soon!
Using scissors, trim your grass as it grows so you have a nice even layer for your garden.
As you can see below the Teeny Tot’s garden started sprouting very thick grass! Definitely in need of a trim, you can’t even see the tomb anymore haha!

I hope you enjoy this project as much as we did. My kiddos loved creating their own garden and I was pleasantly surprised to see how well they each took care of their own. I didn’t even have to remind them to water them!

Not only is this a fun hands-on craft, but it also makes for a great center piece to your Easter dinner table!

Have a fun Easter craft to share? Make sure to leave a comment below!
This is a great thing I am so going to do this with my 4 kids.
We made an Easter garden this year too! It has been so much fun to watch it grow. We are really trying to have a more Christ centered Easter and have been doing some fun activities and crafts. I was thinking today we would make edible tombs out of rice krispie treats. Here’s a link to some of our other activities. http://fromthemrs.blogspot.com/2013/03/2-christ-centered-easter-activities.html
I was just looking for examples of these yesterday, as I planned on trying them with the boys. Just curious, what made you choose the black plastic pots over the terra cotta pots?
Oh this is so great! I’m going to do this with 5 and under so we will see but this I love. Thanks for sharing.
Love this! Gonna make just one, as a family! But curious how you explained this to your 4yr old. (I homeschool a 4 & 2 yr old!)
Please share if you get a chance:)
Would love to hear feedback on this question as well. Thx!
Love! We are so doing this. Thanks for the great idea Erica!
Just curious why you deleted the original post from last year…
What size are the liners I need to find the best price we have around 30 kids in AWANA to buy for
Thank you this is going to be fun!
They were about 12″ in diameter or so.
I’m linking this beautiful idea from my blog and wanted to check if it was ok to show your picture just to link back to this page (I’m making a list post etc)
Hi Tony, yes, you may use my image provided that it is linked back to this post. Thanks for sharing!
Thanks so much & God bless!
I just did this with my Sunday School class of 10 kids last week and it was a hit. The kids had a great time and all they could talk about today was how much grass they have. Most water everyday and are taking special interest in their garden. The parents loved this craft and are helping their kids understand the significates of what Jesus did for all of us. This is a wonderful lesson craft.