

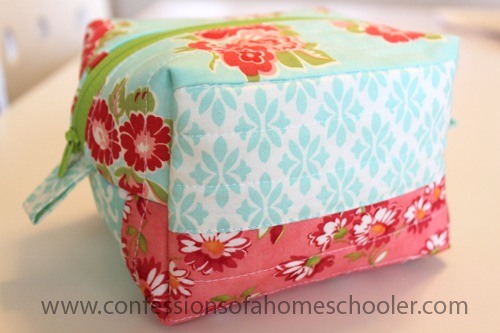

Hi everyone! If you follow me on Instagram you’ve already seen this adorable little zipper pouch. It’s really easy to make, and I had a ton or requests for a tutorial!
Just because pictures can be difficult to tell size, this is a smaller pouch that I use for my hand quilting supplies. It measures about 5” wide x 5” long x 4” high.
I keep small thread scissors, quilting thread, needles, and a couple of Clover wonder clips in here. That way when I’m working on binding a quilt, or need to do a little hand quilting or embroidery on my projects I’m not hunting for supplies.

Ready to make one for yourself?
Supplies:
- A zipper, I used a 22” polyester zipper mainly because that’s what size I could find in this cute green color. But just get one that’s a few inches longer than you want to make your bag.
- Fabric for bag: 2 pieces 10” x 20” (One for outside, and one for lining. OR 4 approx 3” x 20” long scrap strips for the outside and 1 piece for the lining.)
- Fabric for side tabs: 1 piece 2.5” x 7”
- Fusible fleece: 1 piece 10” x 20”
- Straight pins
- scissors
- Optional: clover wonder clips
- Cutting mat, clear acrylic ruler and rotary trimmer
- Iron & ironing board
- Sewing Machine & coordinating thread
For those of you interested, the fabric I am using for my bag is a mix of lines from Bonnie & Camille who are probably one of my favorite fabric designers!
Ready to get started?

–> Download printable instructions for the Boxy Zipper Pouch! <–
Side tabs:
Let’s make the little side tabs first. Cut 1 piece of fabric 2.5” x 7” using your ruler and rotary trimmer.

Next Iron the strip in half length wise so you know where the middle is. Then Iron each side in towards the center about 1/4” or so like I’m doing below:

Then Iron your strip in half again making sure each side is tucked in like below. That way you won’t have any raw edges showing.

Of course you could always just sew the strip right sides together down one side, then flip it right side out. However I dislike turning tiny little strips like that, so this is easier in my opinion!
Next straight-stitch down the open side to secure it, then add 2 more straight stitches, one in the center, then one on the other side just to make it look more professional.

Next cut your strip in half so you have 2 pieces that are approx. 3/4” x 3.5” each and set aside.

Now let’s get to the bag!
We’re going to start off with the outside. Like I mentioned you can use one solid piece of fabric if you don’t feel like getting all crafty. But I just used a bunch of random sized strips from my stash. This is a great project from using up all of those yummy scraps!
If you’d like to use strips keep reading, if you want to use 1 solid piece of fabric skip to the next section.
I used 4 pieces that were approx. 2.5 – 3” wide by about 22” long.

Sew 2 of your strips of fabric right sides together using 1/4” seam.

Next grab another strip and add it using 1/4” seam again. Repeat until you have added enough fabric strips to reach a rectangle of fabric that measures about 9” x 20”.
Iron the strip set so it’s all nice and purdy.

Once you have your outside fabric ready, you’ll want to iron it onto your fusible fleece piece. Follow the instructions on your fusible fleece. Mine just said to iron on low heat so that’s what I did.
You’ll notice that the fleece is soft on one side, and bumpy on the other. The bumpy side is the fusible side, and that’s the side you want to be touching the wrong side of your fabric. That way when you iron, it will stick to the back of your fabric.
This is just to give your bag a little stability and padding.

Once your outside fabric is secured to the fleece we’re going to quilt it. I just ran a straight stitch down each piece about 1/2” apart, but I didn’t measure or anything fancy. Just eye-balled it.
If you used a solid piece of fabric you might try something a little more creative when you quilt it just for added visual interest.

Next trim the edges of your finished piece so everything’s nice and straight. Measurements don’t matter too much here, you just want it to be close to about 9” x 20”.

The next step is to cut your fabric in half. Mine pieces ended up at 8 3/4” x 9 3/4” each because some of my strips were a little off and I had to do a little extra trimming to get them nice and straight. But that’s totally okay! Just as long as you have 2 pieces that are the same size you’ll be golden.

Next cut your lining fabric into 2 pieces that are the same size as your outside pieces. So again mine were about 8 3/4” x 9 3/4”.

Zipper Time!
Layer your pieces as below:
1 piece of outside lining, right side up + zipper, right side down + lining, right side down

You should have a little zipper sandwich now. Make sure your zipper pull is upside down, and that the right sides of both pieces of fabric are touching.

Secure with pins or clover wonder clips. I like these because they’re easy to put on and remove. And they hold thick layers easily.
Now stitch down the edge making sure to get all three layers in. I just used my 1/4” foot, but if you have a zipper foot you’re welcome to use it. It’s not really necessary for this project.

Flip the zipper out, and you should now have something that looks like this…

Now it’s time to add the other side of the bag and lining. We’ll do this the same way, so layer like this:
Your other piece of outside lining, right side up + zipper, right side down (making sure the right sides of the lining are touching) + other piece of lining, right side down just like last time.

Now take this whole thing to the sewing machine and stitch down the edge just like you did the last time.

Next open up your fabric and iron it away from the zipper so you have a nice clean crease. This will make it easier to sew.

Iron the lining side too, just for good measure.

Next, top stitch along the edge of the fabric just to make it look a bit more professional. This will also help keep the edges secure and give your bag a better shape.
If your zipper head gets in the way, you can put your needle in the down position, then lift your presser foot and unzip your zipper to get the head out of the way. Then put your presser foot down and continue sewing.
I did not use a zipper foot for any part of this project.

Next fold the bag in half putting the outside fabric right sides together and do a straight stitch all along the bottom of the bag like below.

The next step is really important.
OPEN THE ZIPPER HALF WAY.
IF YOU DO NOT OPEN YOUR ZIPPER YOUR BAG WILL BE SEWN CLOSED!!!
OPEN THE ZIPPER HALF WAY!
Is your zipper open?
Okay, we can now proceed.

Take one of your little tabs that we made earlier, and fold it in half.

Next fold your bag in half so that the bottom seam is lined up with the zipper, and insert your tab so that the raw edges are along the raw edges of your bag like below, and pin it together. Repeat with the pull on the other side of your bag opening.
Overlap the teeth of your zipper on the side that’s open just a little bit, that way you won’t end up with a big gap in the zipper when you sew over it.

Take the whole thing over to your sewing machine and do a straight stitch about 1/4-1/2” from the edge. I used clover wonder clips to hold it together, but also pins where the open side of the zipper was. This will help the zipper from moving around.
Do the same thing to the other side of the bag so that both sides are sewn.

Your project should now look like this.
See how it’s important that you opened your zipper?

Now grab some scissors and trim off your extra zipper lengths from both sides so that it looks like this.

Next fold your bag the at each of the 4 corners so you create a point in the corner. Mark a 1.5” line up from the tip using a ruler and pen, like I’m showing you here.

Sew along this line, and repeat for all 4 remaining corners. This is what will give your bag a boxy shape.

Flip your bag right side out to test the shape. If it looks okay, trim off the edges leaving 1/4” past your sew line.

You should now have 4 cute little hats that you can give to one of your kids to use with their dolls.

If you like you can run a zig-zag stitch along all of the raw edges of your bag just to give it a finished look. An it will also make your bag washable.

Rejoice!
Next flip your bag right sides out, and voila! You have the cutest little zipper pouch ever!
And you may have just quilted for the first time in your life too ![]()
You may have even installed your very first zipper! Eeek!

–> Download printable instructions for the Boxy Zipper Pouch! <–
If you make this sweet little bag, make sure to post it on your social media and tag me using #coahzipperpouch so I can see all of your creations! If you follow me on Instagram, make sure to tag me using @ericaarndt so I can see what you all make!
Happy sewing day! Now go pick out some cute fabric and get sewing!
I am so looking forward to making this bag for my sewing/quilting supplies. Thank you for sharing and taking the time to do this!! See ya on IG, Erica!!