


Happy Friday everyone! I’m excited to share a fun activity we did this past week. As you can see from the picture above and the title of this post, we made our own homemade lip balm!
Not only was it fun, but it was much easier than I thought it would be. It’s nice to know what we’re putting on our lips, plus it was cool to design our own labels too!

So what do you need to do this with your kiddos?
- 2 oz. + 1 heaping Tablespoon Organic Extra Virgin Coconut Oil
- 1.5 tsp Vitamin E Essential Oil (You can use the gel caps or the dropper formula.)
- 2 oz Cosmetic Grade Beeswax
- Plastic Lip Balm Containers (I found mine at JoAnn’s in the bead section, but you can also order them online here.)
- Optional: 25 drops vanilla essential oil or peppermint essential oil (or whatever scent you prefer, just make sure to use an essential oil for fragrance)
- Optional: A slice of your favorite colored lip stick if you’d like to add a slight tint to the balm.
Other Items:
- Sauce pan & metal mason jar lid ring
- wooden Spoon
The first step is to place your coconut oil, beeswax, and vitamin e oil into a glass measuring cup. The vitamin-e will act as a moisturizer and preservative, the coconut oil is our moisturizer, and the beeswax will hold everything together.
I would suggest using one you don’t care about, or buy one to use only for lip balm. You can wash it out when done, but there’s kind of an oily film that doesn’t seem to go away.

Next, get a pan and fill it about half way with water and bring it to a boil. I also put a metal mason jar lid inside of ours to create a homemade double boiler type contraption. You do not want to place the glass measuring cup right in your pan as it may crack from the heat.

Once the water is at a slight boil, place your glass measuring cup into the water to melt the oils.

I suggest enlisting a kid or two to help stir, it took us about 15 minutes for all of the oils to fully melt together. While stirring be careful NOT to allow any water to splash into the oils as it can contaminate your balm.

After all of the oils are melted together, the beeswax will take the longest, you should have a nice golden liquid like this:

Adding Fragrance & Flavoring to Your Balm: (Optional)
At this stage, you can add in your favorite essential oils for fragrance. Do this while your balm is still over the heat so that the cooler oil doesn’t cause your balm to solidify again.
You can skip this step, but I personally don’t love the scent of this balm, so we like to add either a vanilla essential oil or peppermint essential oil scent to it using essential oils. You can also add in flavoring if you like, I use Candy & Baking Flavoring oil such as cherry, watermelon, or spearmint.
- Fragrance: Keep in mind some oils are stronger than others, so you might consider adding a few drops at a time until the scent is to your liking.
- Flavoring: To test the flavor of your balm, you can dab a small amount onto your lips. Keep in mind that the flavors get a bit stronger as the balm solidifies.
NOTE: I would NOT use Vanilla Extract to scent or flavor your balm as it does NOT mix well with the other oils and you’ll end up with a kind of splotchy looking balm.
Once the balm is scented & flavored to your liking, carefully pour it into your containers and allow to cool fully.

As you can see we made a couple varieties of balms. This one is a nice light yellow color, and is just the basic balm, no coloring.

For a more colorful balm, I shaved off a bit of one of my lipsticks and added it to the mixture after all of the oils were melted, then we poured into the containers. This is just enough color to tint the balm, and give a VERY slight pink tint when applied to the lips. I’ve found that brighter lipsticks provide the best coloring. Next time we’ll go for a hot pink lip stick I think.

Here are the three shades we ended up with. The yellow one is uncolored, the sort of tan one to the left we tried to color using some organic cherry juice I had. This didn’t work quite as well and if you look closely you can see specks in the balm where it didn’t quite blend with the oils. The more pigmented one to the right had lipstick coloring added which worked really well, so from here on out this is my preferred method for coloring the balms.

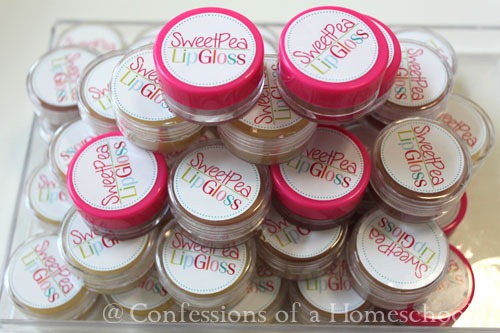
Once the balms were all cooled, we added the lids to them and started working on a design for our labels.

I purchased Avery Full Sheet Label paper from Office Depot, then made these cute lip gloss labels using Photoshop. Next we cut them out with a circle punch, ours was a 1 1/4” circle punch, but you’ll want to use whatever fits your containers.

Finally we labeled all of our balms! Aren’t they pretty? The girls took them to their friends and sold them for $1 which I thought was funny and quite entrepreneur-ish of them. They didn’t however repay their mama for supplies…hmmm…

So that’s it, our easy homemade lip balm tutorial! The vitamin-e acts as a preservative for the balms, so they should last about one year, but just keep an eye on them for any molding since they’re all natural.
I hope you enjoy this recipe, if you have a favorite lip balm recipe to share make sure to leave a comment below! This was so fun, and I’d love to try it again. Since this is a more solid balm, my next venture is to try and create a lip butter that is a bit creamier.
Have a great weekend, and let me know if you end up doing this project with your family!
This is a neat project. I have a question about the tint and flavor, does the essential oil flavor it or just scent it? Is there something organic you can use for the tint?
Hello, I love your website. I just ordered the Pre-K downloads for my daughter. I am having problems opening up the files. I followed the instructions posted on the page, however, i was unsuccessful. If you could walk me through the process that would be wonderful. Thank you and have a nice day.
This looks like lots of fun. My kids are always asking for things they can do to make money. My question is this, how much did the supplies cost (ballpark)? I’m not looking to (fully) fund their efforts, lol.
Wow! How fun!! I am incredibly impressed that you made adorable labels and everything. I may not be able to show the kids that part or they might be disappointed in our end product! Thanks for sharing
Is what you are showing all from one batch? I am thinking Mother’s Day Gifts!
oh,my,gosh.That’s an awesome idea.LOVE IT!!!!!!!!!!!
I cant read the label on the tray of jars at the start.
Can you tell us what the size of pots are that you use please.
That way we can copy the amounts you have used accurately. Thanks.
Sorry, The jars are 1 1/4″ Diameter x 3/4″ Height
You said where to get the containers, but how about where to find the other supplies?
Hi Tammy,
everything is linked in the post, so you can find the ingredients.
Thank you so much for sharing this! We ordered our supplies and made half a batch (fills 12 pots) and my daughter has been selling them! Thank you for all you do through Confessions of Homeschooler!
Your children are really lucky to have a ‘teacher’ like you… I hope our 5 young children feel the same way..hahaha. We have enjoyed trying some of the teaching material you share…THANK YOU! Am I remembering that you commented your glassware left a film after making these lip balms??! Have you tried using GET CLEAN Hand Dish Wash (Shaklee)?? It worked getting the film off my glass measuring cup… Hope this helps! (: