

Hi everyone! If you follow me on Instagram you’ve already seen this adorable little zipper pouch. It’s really easy to make, and I had a requests for a tutorial, so that’s what we’re doing today!

–> Download the DIY: Zipper Pouch Printable Instructions here! <–
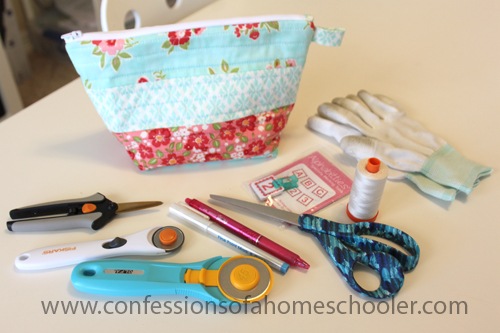
Just because pictures can be difficult to tell size, this is a smaller pouch that I use for my sewing supplies. It measures about 10” wide x 6” tall x 3” wide.
The tutorial is going to be really similar to how we put our boxy zipper pouch together, but our final result will end up more like a normal pouch rather than a boxy shape.
Ready to make one for yourself?
Supplies:
- A zipper, I used a 22” polyester zipper mainly because that’s what size I could find in this cute green color. But just get one that’s a few inches longer than you want to make your bag.
- Fabric for bag: 2 pieces 10” x 20” (One for outside, and one for lining. OR 4 approx. 3” x 20” long scrap strips for the outside and 1 10”x20” piece for the lining.)
- Fabric for side tabs: 1 piece 2.5” x 3.5”
- Fusible fleece: 1 piece 10” x 20”
- Straight pins
- scissors
- Optional: clover wonder clips
- Cutting mat, clear acrylic ruler and rotary trimmer
- Iron & ironing board
- Sewing Machine & coordinating thread
For those of you interested, the fabric I am using for my bag is a mix of lines from Bonnie & Camille who are probably one of my favorite fabric designers! These strips are mostly from an older line called Marmalade.

Side Tab:
Let’s make the little side tab first. Cut 1 piece of fabric 2.5” x 3.5” using your ruler and rotary trimmer.

Next Iron the strip in half length wise so you know where the middle is. Then Iron each side in towards the center about 1/4” or so like I’m doing below:

Then Iron your strip in half again making sure each side is tucked in like below. That way you won’t have any raw edges showing.

Of course you could always just sew the strip right sides together down one side, then flip it right side out. However I don’t like to take the time turning tiny little strips like that, so this is easier in my opinion!
Next straight-stitch down the open side to secure it, then add 2 more straight stitches, one in the center, then one on the other side just to make it look more professional. Then set your tab to the side for later.

Now let’s get to the bag.
We’re going to start off with the outside. Like I mentioned you can use one solid piece of fabric if you don’t feel like getting all crafty. But I just used a bunch of random sized strips from my stash. This is a great project from using up all of those yummy scraps!
If you’d like to use strips keep reading, if you want to use 1 solid piece of fabric skip to the next section.
I used 4 pieces that were approx. 2.5 – 3” wide by about 22” long.

Sew 2 of your strips of fabric right sides together using 1/4” seam.

Next grab another strip and add it using 1/4” seam again. Repeat until you have added enough fabric strips to reach a rectangle of fabric that measures about 9” x 20”.
Iron the strip set so it’s all nice and purdy.

Once you have your outside fabric ready, you’ll want to iron it onto your fusible fleece piece. Follow the instructions on your fusible fleece. Mine just said to iron on low heat so that’s what I did.
You’ll notice that the fleece is soft on one side, and bumpy on the other. The bumpy side is the fusible side, and that’s the side you want to be touching the wrong side of your fabric. That way when you iron, it will stick to the back of your fabric.
This is just to give your bag a little stability and padding.

Once your outside fabric is secured to the fleece we’re going to quilt it. I just ran a straight stitch down each piece about 1/2” apart, but I didn’t measure or anything fancy. Just eye-balled it.
If you used a solid piece of fabric you might try something a little more creative when you quilt it just for added visual interest.

Next trim the edges of your finished piece so everything’s nice and straight. Measurements don’t matter too much here, you just want it to be close to about 9” x 20”.

The next step is to cut your fabric in half. Mine pieces ended up at about 11” x 9 3/4” each because some of my strips were a little off and I had to do a little extra trimming to get them nice and straight. But that’s totally okay! Just as long as you have 2 pieces that are the same size you’ll be golden.

Next cut your lining fabric into 2 pieces that are the same size as your outside pieces. So again mine were about 11” x 9 3/4”.

Time for the zipper!
We’re going to do a more finished zipper for this project. It’s really easy and I think it makes your bag look a little more professional.
The first step is to center your zipper along the long edge of your bag, and then trip off one end about 1” past your bag.

Next cut a piece of fabric 1” wide by 4” long. Iron it in half, then fold in the edges and iron them into the center just like you did for your side tab.

Place the cut end of your zipper into your fabric piece and stitch along the edge to secure it in place.

I went back and forth twice using a straight stitch just to make sure it was secure.

Next trim off the edges of your fabric so that they line up with your zipper. Save the piece you cut off for the other side of your zipper.

Next OPEN YOUR ZIPPER about half way, and then line up the finished zipper edge with your bag piece like below.
Measure 1” in from the other side of your bag and carefully cut your zipper along that mark.

Try not to freak out.
It will all be okay.

Next add the fabric piece you set aside from the other side of your zipper to the unfinished side. I used pins to hold it in place, and you’ll want to try and get the teeth as close as possible. This side is a little bit more tricky since your zipper is open.

Run a straight stitch along the edge of your fabric to secure it in place just like you did for the other side and then trim.

It should now look a little bit like this…

Next lay your bag lining right side down on top of your zipper. You should have a little zipper sandwich now like below. (Ignore the green zipper, I forgot to take a pic, so this one is from my other pouch). Make sure your zipper pull is upside down, and that the right sides of both pieces of fabric are touching.

Secure with pins or clover wonder clips. I like these because they’re easy to put on and remove. And they hold thick layers easily.
Now stitch down the edge making sure to get all three layers in. I just used my 1/4” foot, but if you have a zipper foot you’re welcome to use it. It’s not really necessary for this project.

Now it’s time to add the other side of the bag and lining. We’ll do this the same way, so layer like this:
Your other piece of outside lining, right side up + zipper, right side down (making sure the right sides of the lining are touching) + other piece of lining, right side down just like last time.
(Again, ignore the green zipper. Your zipper will not be stretching past the fabric like that one.)

Now take this whole thing to the sewing machine and stitch down the edge just like you did the last time.

Next open up your layers an it should look something like this. Run a quick top stitch down both sides of your zipper just so that your layers will lay nicely.

Next open the zipper back up if it isn’t already.

We’re going to add your little tab, so grab the one you’ve already set aside and fold it in half.
Place it on the end opposite of where your zipper pull closes fully. The tab should go in towards the outside of the bag like below, and line up the raw edge of your tab with the raw edge of your bag.

Next fold the bag in half so that both of the outside pieces of your bag are touching. It should look something like this, with the tab edges showing as well. You’ll want to secure the tab with pins.

Next use a straight stitch and sew all along all four sides of your bag making sure to get the little tab in the stitch. I used about 1/4” seam allowance for this step.

Your bag should look like this now, which is why it’s very important that you opened the zipper!

Next fold your bag the at each of the 2 bottom corners so you create a point in the corner. Mark a line 2” up from the tip using a ruler and pen, like I’m showing you here.

Sew along that line, then trim the remaining corner off leaving about 1/4” Left.
Repeat this process for the other corner so that you now have a flat bottom to your pouch.

You can run a zig-zag stitch along the seam if you would like to make it a little more finished.

All Done!
Flip your bag right sides out, and you’re done! Isn’t it cute?

I keep my rotary cutter, scissors, Frixion pens, my quilting gloves, and other supplies that I use frequently in this handy little pouch. But you could really use it for anything. It would be a great travel pouch too!

I hope you enjoyed this tutorial, and if you make this bag make sure to tag me on social media so I can see what you create! If you follow me on Instagram, make sure to tag me using @ericaarndt or use the hashtag #coahzipperpouch
–> Download the DIY: Zipper Pouch Printable Instructions here! <–
Happy sewing!
Hi Erica,
I can’t wait to make this bag. I am waiting for fall to set in to begin sewing. Both of the bag tutorials that you shared are on my to-due list! Thanks for sharing these. As a newbie to sewing and quilting, I need some tips on binding,…..maybe you could make a binding tutorial? Also I would love to see a video on how you free motion designs on your quilts. They all look so beautifully done!
Thanks again,
Karen
So excited to do this with my girls. Your instructions are so clear and the photos are really helpful to refer to. Home Ec. project for the start of our school year!!!!
Wonderful tutorial for an adorable little bag! Thanks for all the photos – it really helps a beginner like me. 🙂
I like your tutorial but I would like a video even better as I am a visual learner. I also like the tabs on either side of the zipper. It adds such a nice finished look. Thanks for sharing.