

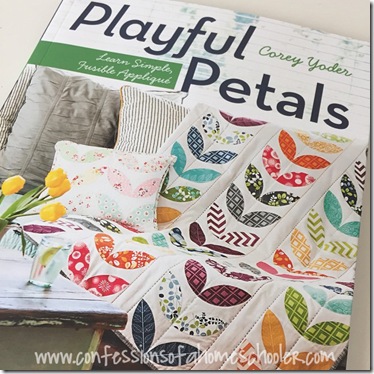
Good morning readers! I have another fun WIP post for you today! I’ve been working on this super cute Petals quilt, and it’s almost done! As soon as I saw the cover of the Playful Petals book by Corey Yoder from Little Miss Shabby I knew I wanted to try and make one.

There was only one small problem.
I’ve never done applique’ before.
Then again, I’ve never really quilted before either!
So I figured I’d give it a shot. I mean why not start off with something difficult like applique’ first? Then everything else will seem easy right!?
I don’t feel like I do a very accurate job at the cutting process yet, so anytime I can save some time and sweat I do! That’s why I’m totally digging pre-cuts. Now I will say that they’re a bit more pricey, so if you’re good at cutting, then you’ll want to buy your fabric by the yard.
Me, not so much.
So I went for a Moda Bella Bleached White (9900-98) layer cake, and a matching jelly roll. Yum! Not only are these super cute, but they’re so much easier to deal with for me right now.
Fat Quarter Shop is one of my favorite places to get fabric, shipping is fast, and she has great prices. If you have time, stop by the Fat Quarter Shop Facebook page and let her know I sent you her way!
The book gives measurements for yardage as well as a layer cake so it was easy to follow. I decided to make mine 5-10” blocks across, and 7-10” blocks down, plus 2” sashing in between each of the vertical columns.
In the book, Corey used the beautiful Simply Color by V and Co. fabric, but I couldn’t get ahold of it, so I ended up just heading to a local fabric shop and picking out about 25 fat quarters that seemed to blend together well. I ended up not using a couple of them once I got petals cut out, and I added in some navy petals later on, but that’s how it goes right?
I think picking colors is the hardest part of the whole quilting process!

To do the applique’ I used Heat-n-Bond Light. I traced out the petal shape (included in the Playful Petals book) onto a piece of light weight cardboard. (Actually I used the cardboard from the back of the layer cake!) Then I used the cardboard to trace the shape onto the PAPER side of the Heat-n-bond Light. The cardboard worked really well as opposed to trying to trace it from a piece of paper because my pencil could rest against the edge of the cardboard making for quick tracing!
Note: I also tried Steam-a-seam (shown below) per recommendation from the ladies at the quilt store I went to. And honestly I will NEVER use that again! Not only was it super tacky and difficult to work with, it gummed up my scissors, and sewing machine! Yuck!
Normally you’d cut out each individual petal from the fusible web, but the steam-a-seam was so sticky and gunky that I thought maybe using one large piece would work better. It did, but still got tacky stuff on my iron. Yuck.
The Heat-n-bond Light is really good though, not tacky, and worked really well. The paper also peeled off easily and made for quick work.

Since I had 35 squares, I made 140 petals. Wow. That’s a lot of petals people. But it went fast! And I recruited Turbo & Tinker Bell to help me peel off all of the paper backing which made it go quite quickly!

I used a Moda Bleached White (9900-98) jelly roll for my sashing. It was so much easier, and I only used 8 pieces, so I have plenty left over for my next project! YAY! And look how cute it is all rolled up like that. The hardest part is opening it and ruining that lovely roll.

Can you tell that I did most of this in my kitchen? The kids had to find somewhere else to eat LOL! No food by the fabric!

Next it was time for batting and backing. I chose Warm & White Needled Cotton Batting. Since my top was white, I didn’t want the natural tan color showing through that some other battings have. I found a chunk that was 72” x90” , it was a bit too large, but better too much than too little. And I saved the left overs for another project. JoAnn’s has batting that you can purchase by the yard, and it just so happened to be 30% off and I had a coupon for my total purchase too, so yay!
I tried spray basting this initially and honestly the basting spray worked great for the batting and backing fabric. However, I couldn’t get it to stick to the quilt top, so I ended up pin basting it. I’m not sure what I did wrong with the spray, but I didn’t want to spray it too much, and I’m not too excited about the chemicals anyway, so I’ll probably just pin baste in the future.
Here’s a great video on pin basting from my friend Melanie. You just need several safety pins (regular or bent for quilting). It went really fast, and was easy peasy!

As you can probably tell from the photo I basted it on my kitchen floor. I smoothed out my backing fabric wrong side up, making sure there were no wrinkles in it and then taped that layer to the floor using blue painters tape. Next I smoothed out my batting. It was wrinkly from the packaging so I just stuck it in the dryer for a bit to loosen the wrinkles. DO NOT IRON YOUR BATTING!
Next I added my freshly ironed quilt top onto the top of the batting and made sure all 3 layers were nice and smooth.
Then I just had a seat on the floor and start pinning all 3 layers together. I started in the middle and pinned outwards smoothing it as I went. I pinned every 3-5” or so my layers didn’t slide around when I quilted it.

Since I am into trying new things, I also decided to hand stitch vertical lines down this bad boy.
Yes, you heard me, H A N D stitch.
I used Perle cotton #12 from a local craft store in 6 different colors that went well with my quilt top. I used these super long quilters basting needles. Probably not the right choice, but I wanted to be able to load a few stitches on my needle at once to save time. As you can see in the photo below I bent a few ;o)
And of course I used a thimble to help push the needle through the layers. Ouch.
I did a nice big stitch down the center of the petals, then one on each side of the sashing so there were a total of 13 rows for me. My stitches went through all 3 layers of my quilt, so you can see the stitch lines on the backside as well. And seriously once I started turning it all over the place to quilt it, I was very thankful for all of those pins!
As you can see below, my stitches aren’t perfect, but I love how it turned out. Since I didn’t think I could sew a straight line down the center of the petals, I used a disappearing ink pen for quilting and a ruler to create a straight line for me to follow.

Here it is so far…I’m working on binding now, but that’s a post for another time!

Don’t forget to check out Corey Yoder’s Playful Petals book for some more beautiful petal patterns including this one! And if you have time, stop by Corey’s Little Miss Shabby Facebook page and send her some love for creating such a beautiful book with amazing ideas!
Beautiful quilt!!!
And I LOVE the view from your deck!!!!!!!!
His
Shari
Thanks Shari!
Hi Erica,
I love your quilt! I began sewing and quilting in 2010 and love it! This is a lost art and I am so glad to see you blog about your projects! My daughter who is 8, wants to learn too! I can’t wait for her and I to make our first quilt together. I am curious if you treated yourself to a new sewing machine and what brand you picked? Also if you don’t know about Missouri Star Quilt Company,…Jenny Doan is my go to gal for tutorials and this is where I learned so many fun sewing and quilting projects. I need to tackle how to bind myself, but I believe on MSQC you can find a tutorial!
Homemade gifts are really the best, thanks for sharing and inspiring new ideas!
Karen Henry
Karen,
YES! I love Jenny! Missouri Star Quilt Co. on YouTube is one of my favorites!
Oh, and I finally decided on a Juki g210. So far I love it, it’s great with thick fabrics like several layers of furry quilting!
Your quilt is so pretty. I love the colors you chose. Great job for a first quilt! My question is – what does the “WIP” in WIP Wednesday stand for?
Hi Jill,
Thanks! WIP = work in progress ;o)
Wow, I’m impressed that you hand quilted it! I know I wouldn’t have the patience for that, so I don’t even try. I hand stitched the binding on a quilt once and hated every minute of it, so I even machine that now! This is all so ironic because I love other hand-crafts. I adore crocheting and cross stitching, but I just can’t get myself to want to do hand quilting. So kudos! 🙂
I love your quilt and the hand quilting is so cute! You should be really proud of your beautiful creation. I’m always happy to hear about new quiltaholics!
Beautiful quilt! You inspire me to try it! Thank you so much for EVERYTHING you share on your website. I am loving your WIP Wednesdays!
Beautiful work! I have always loved the idea of quilting, but family life has never allowed for such quite yet. Maybe soon…
I love it. I have always wanted to quilt, but the last time I sewed was home ec 25 years ago!!
You have inspired me to just try it. Maybe some baby steps first!!