

Hi everyone! Fall is here, and I absolutely L.O.V.E. the beautiful colors, crisp air, cozy sweaters, and all of the fun crafts that go along with this time of year!

Now I know this isn’t a new idea, but honestly we haven’t made the paper pumpkins before. I know, crazy right?
Anyhoo, the Teeny Tot has been asking for crafts nearly everyday, and so I’ve had to come up with some ideas and since fall is upon us, I thought some fun pumpkin crafts would be the way to go!
This craft is not only fun and easy, but it’s great for improving fine-motor control, scissor skills, and creativity!
So all you need are:
- Orange construction paper
- Green construction paper
- Scissors
- Ruler
- Pencil
- Metal Brads
- Hole punch (optional)

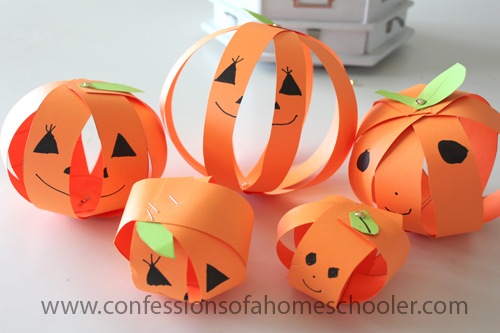
Step 1: Using your ruler draw vertical lines along the short side of your construction paper to create 8 1” strips. (I know my pic has 7 strips, we used more than one sheet of paper.)
We just used the width of our ruler so it was easy. If your child is able, show them how and have them practice drawing the lines on as well.

Step 2: Trace a leaf shape on your green paper.

Step 3: Cut the orange paper along the lines, and cut out the leaf.
Step 4: Line up your orange strips and hole punch them all at the top, you can include the leaf in this so they line up. Next place a hole punch on the other end of your paper as well.
Step 5: Place a metal brad on the end with the leaf and secure.

Step 6: Turn your work over so the backside of the brad is showing and spread out the strips of orange paper evenly. We found it is best if you use 8 strips, but you can use 6 if you like.

Step 7: Take opposite sides of the strips and pull them up to meet in the center forming a circle shape. Do this with the remaining strips and then secure them with a brad.

Step 8: Draw on any fun faces you want and then go make some more!

Once everyone saw the first pumpkin, it became quite the popular activity and I found everyone in there making them.

Needless to say with 4 children, we now have a plethora of pumpkins to decorate our school room!

And of course the Teeny Tot requested to do a pumpkin dot-to-dot worksheet too!

And that’s it! Super easy, fun, and as you can see they figured out how to make smaller and larger pumpkins based on how long their strips of paper were.

I hope your kiddos enjoy this craft as much as mine, and if you have another fun one to share make sure to leave a comment below!
We’ve never made paper pumpkins either. Even though my kids are older, I think my youngest would still enjoy this. Thanks for the idea!
I love your website so much! I visit it everyday! As a new homeschool mom of 2 I love your craft suggestions and planners plus all the great curriculum suggestions and printables. My girls and I loved making these yesterday! Thanks so much and keep up the good work! God bless you!
I made these with my daughter yesterday and my son today….first time for us. I hadn’t intended for it to be done separate for them, but I’m glad we did it that way to see them each be their own person and let their style out. It was interesting to see their unique style in these years of competition and copycat. 🙂 My son stacked some black foam dots and added a small yellow dot on the top and a small strip of yellow on the side of the black dot tower and placed it in the bottom of his for a candle with dripping wax! We used a variety of leftover foam stickers for faces and decorations.
Anyway, I’m commenting because while my son was doing his he had a really hard time lining up the holes as he gathered the strips at the bottom. I had a lucid moment and tried something new with him. Instead of spreading out the strips, we left them piled in a line and put the brad through the hole. So his pumpkin was just a stack of strips, fastened at both ends. We then pulled the pieces away from each other and they naturally bowed into a sphere for his pumpkin! It was an awesome visual for him (and me!) to see a flat strip stack turn into a sphere!
Another thing I noticed after making these: when we did the above method or gathered them as in the post, going around the strips in order, the pumpkin strips move very freely creating gaps in different areas, allowing the pumpkin to morph a bit. When I gathered them randomly, they locked into place keeping those pumpkins more solid and stable. We like both versions and this was a great lesson to go with the craft (we are not homeschoolers but I love when a craft becomes a lesson too!).
Hi Jan,
great idea, actually I did the same thing with the Teeny tot because she was having a hard time too. Thanks for commenting!