

Good morning readers! I have another fun WIP post for you today. Fat Quarter Shop is hosting a Snapshots quilt along benefiting St. Jude’s Children’s Research Hospital. There are some super cute blocks in this quilt along so make sure to check them out!

Each month they’re sending out a free block pattern and they just ask for any donation you’re willing to make to support St. Jude’s. It’s a great cause, and this quilt is so cute I couldn’t resist! They offer it in a kit as well, or you can make the quilt with your own selected fabrics.
I am making mine out of Pam Kitty Garden Aqua fabric from the Fat Quarter Shop. I purchased a fat quarter bundle along with 2 yds Moda Bella Solids in white 9900-98 for the background, and Moda Best Day Ever Grass green fabric for the cake stands.

I also grabbed some of the Fat Quarter Shop Alphabities to help me keep track of all of my pieces! They were very helpful.

The first block in the quilt along was a super cute cake block and once I made one, I decided to do a whole quilt with just that block. My daughter loved it and I think it turned out super cute.
Since there were so many pieces included in this top, I had to label them to keep everything straight. I cut up the pieces for each block then stored them in plastic baggies to keep them organized.

I made all of my cake stands first just to get those done, then I started cutting out all of the pieces for my remaining cake blocks. I made my quilt 4 blocks across by 4 blocks down. I included a 2.5” white sashing with square posts in between each block to make the overall quilt a little bit larger.

I also chain pieced all of my pieces just to make it go faster. If you haven’t heard about chain piecing blocks, check out this video tutorial on chain piecing and nesting seams by Melanie Ham. It saves so much time and thread!

Once all of my blocks were completed, I arranged them on the floor, then added a row of 2.5” sashing with 2.5”x2.5” posts in between each sashing strip.

Since my daughter had picked out a teal minky backing I decided to just quilt the top and batting. Then add the backing later.
I machine quilted diagonal lines on every other cake block like below. Since I didn’t trust myself to sew in a straight line, I used a Blue water soluble marking pen and a ruler to draw the lines on my blocks. It washed out wonderfully when all was done!

On the alternate blocks, I did a hand stitching around the cake stand and cake layers.

I used perle cotton #12 in white to do the hand stitching. I like this thread, it’s nice and smooth and doesn’t get tangled too easily. If you want your hand stitching to be a bit more noticeable you can also use #8 which is a bit thicker. As you can see, I had a little bit of help with my quilt. Our kitty likes to lay on all of my fabric and quilt tops. He tests them out for durability and quality control.


Here’s the finished quilt top and batting layer. I trimmed the excess quilt batting and squared up the quilt top using a 12” square ruler and my rotary trimmer.

Next I placed my backing fabric right side up on the floor and then placed my quilt top right sides down on top of the backing. I cut the backing so that it was about 2” larger all the way around.
Then I stitched around the edges of the top making sure to leave about an 12” opening at the bottom of the quilt to turn it right side out.


Because I wanted the furry side to peek out a bit on the edges of the quilt, I chose to do a mitered corner look. I followed the tutorial on this Missouri Star Quilt Co. video to help with my corners. It was a bit scary cutting them off like that, but it worked like a charm!

Here is how my finished corners turned out.

Next I closed up my bottom opening by doing a top stitch around the edges of the entire quilt. This also helps keep the backing in place. It is loose from the quilt top otherwise, so I may go in and do a few small stitches on the block corners just to keep it in place.

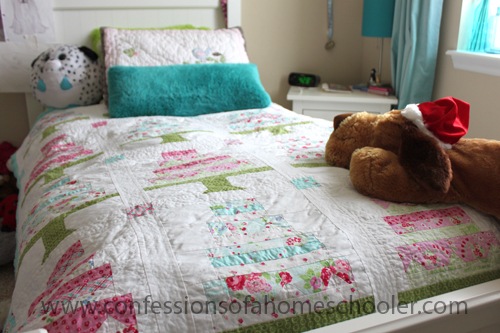
And here is my finished quilt top! It ended up at about 60” wide by 74” long. It fits well on my daughter’s twin bed, though it doesn’t have a lot of overhang. If you wanted to make it a bit larger you could always add another column of cake blocks, or a border to increase the size a big.

I also made a matching doll quilt which I’ll share more on in another post. But doesn’t it look cute next to the big bed?

And that’s it! This quilt was fairly easy to put together, and the Fat Quarter Shop instructions are really easy to follow. I’d love to see pics if you are inspired to make this quilt top too, so make sure to email me, or post them on my forum in the quilting section!


Want more information? Visit the following links for the cake block instructions! And don’t forget to donate to St. Jude’s if you decide to participate in the quilt along or use the pattern!
- Fat Quarter Shop Let Them Eat Cake pattern
- Fat Quarter Shop video tutorial
- Fat Quarter Shop Let Them Eat Cake blog post
- Snapshots quilt along
Happy quilting!
That quilt is beautiful and you always have the best step-by-step tutorials! Thanks so much for sharing!
I love, love, love this! The quilt is perfect, and St. Jude’s is a wonderful organization.
I ADORE this quilt! Thank you for such a great & detailed tutorial!
It’s adorable!
I swear I don’t know where you find the time!
Some days it feels like I can barely get dinner out after teaching. !
Can I adopt you as my sister and have you make me one? lol
My daughter saw these pics and of course now wants one too.
Humph.