

I’ve had a few questions on how I organized all of my Letter of the Week and K4 Kindergarten Curriculum, so I thought I’d show you all some pictures!

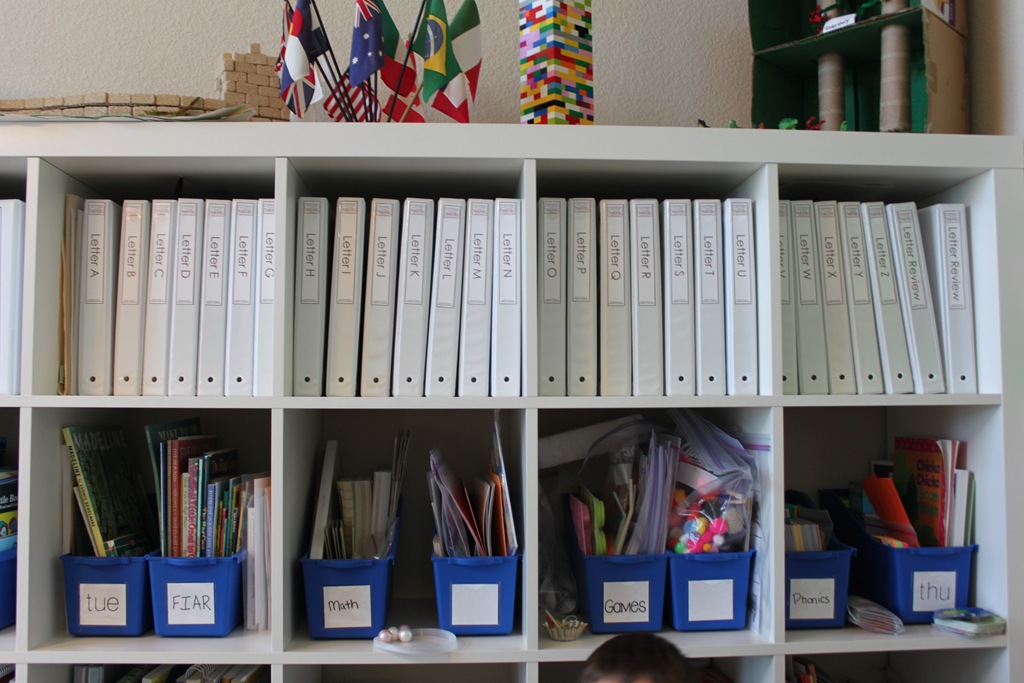
Since I’ve printed ALL of my printables, I had to come up with some way to store them all! I decided binders full of page protectors was my best bet. Along the top of my Ikea Expedit Shelving unit, you will find binders…lots of binders! (They are cheap 1” binders from Wal-m*rt)
Each binder has a spine label on it indicating the letter, then inside are page protectors housing all of the games for that letter. (The spine labels are part of my Letter of the Week Curriculum in the “extras” folder and K4 Curriculum as well.)

I store small game pieces in snack size Zip-loc baggies, then put them inside the page protectors for safe keeping.

I also put several pages into one page protector, for example all of the Large Floor Numbers for Letter A are in one page protector.

If you aren’t feeling like laminating everything, page protectors are also a great way to be able to re-use the items that are to be traced like the pre-writing pages.

As you can see, I’ve put more than one game in each page protector just to make the most out of my space.

ALTERNATIVE STORAGE IDEAS: Instead of using binders, which can take up a lot of space, you might consider using 9×12 clasp envelopes. You’ll need one folder for each letter plus a few extras for review games. Label them Letter A, Letter B, and so on. Then place the individual games in snack size or sandwich size Ziploc baggies and store them inside the appropriately labeled envelope. Store your alphabet envelopes in a plastic file crate or on a bookshelf.
And that’s it! Lots of binders or folders, and some baggies and page protectors and you’re all set!
NOTE: You may not need to purchase 26 binders like I did, it will depend on how many games and such you have printed from the curriculum. I’ve had other readers say they’ve fit a few letters in each binder, so you’ll want to figure out about how much you think you can fit before going crazy in the binder isle ;o)
For the K4 Curriculum, I used 4 binders.
So, for what it’s worth, I hope that helps some of you on the organization side of things!
For more information on Letter of the Week and K4 Curriculum, click the buttons below:


This is our fourth year homeschooling and I have fallen in love with your letter of the week program! I plan on printing everything to use with our 2yr old when the time comes and with the preschool class I teach at our co-op this year. For storage I am putting everything for each letter in a manila envelope, three hole punch them, and place them in a three ring binder(s). I will label each envelope with a sharpie. Maybe stickers or stamps………….we’ll see. Thank you for sharing! 🙂
Heather.. I am curious if you are putting all the manilla envelopes in one huge binder?
I have just found your website and LOVE your activities! I would like to print the magnetic page sheets for each letter, but it takes me to 4Share and the file is not there. Is there another way to print them?
Thanks so much.
Thanks for everything! I love your curriculum! Do you print everything in cardstock and then place in the page protectors or do you just use regular copy paper?
Hi, I LOVE your printables! I have been/will be teaching my son sign language and was wondering if the sign language cards pictured above (in your how to store post) were part of the Letter of The week curriculum? If so are they part of your free printables and if so where can i find them or are they part of the paid for curriculum you offer? Im thinking of purchasing the Letter of The Week and was wandering. Thanks and keep up the great work!
Hello,
This is my first time trying to homeschool my 4 year old daughter. I am a little nervous on homeschooling my daughter because I do not know if I can actually do it. I have read that I have to buy and print the whole set of the Letter of The Week? Do I have to teach my daughter on an isolated part of the house so she can focus or anywhere would be fine?
Thanks!
I just wanted to share another option of storage for the LOTW curriculum. Instead of using a separate binder for each letter, I purchased some letter-sized expandable file pockets (around $20 on Amazon for 50 of them) and I store each letter in one file pocket. This also allows all the laminated pages to fit in as well. I put all the filled file pockets in a file box and everything is in one place with minimal space used!
I would seriously pay you to create these folders for me!
first of all, let me say that I LOVE your site! Question, I’m laminating most of the page that I’m not putting in a workbook. However the laminated pages don’t get in the sheet protector. Are you putting ur laminated pages in protectors too? What am I doing wrong? Do I need a specific size? I bought the one that holds multiple pages up to 70 sheets. Thanks!
Hi! This is one of the only a few places I could find to get a comment to you. Do you know that under the heading “Free Printables” that some of the items in the categories are *not* free? I was hoping to download a sample of a Literature Unit, but each of the ones listed takes you to the purchase page. I realize you have given great explanations & great photos of the Literature Units, but I was hoping for a few sample pages, even if they were various pages from various studies. And, wanted to make you aware of that the heading “Free Printables” isn’t accurate for some of the categories! Not complaining at all — I love your blog & FB & Pinterest pages, and recommend you to local homeschoolers often!!
Hi Karleen,
I apologize for any confusion, I try to make sure everything is linked on my site so people can find things. Maybe I should rename the link. Or put a note at the top of each page. Thanks for bringing it to my attention.
Hi Erica –
Do know if Lakeshore Learning still sells the blue bins?
-Misty