Hi everyone! I’m back today with another Homeschooling 101 post for you! Last time around we discussed Teacher Organization, so today we’re going to talk student organization!
Organize Student Daily Workload
Most of you know I’ve used some form of the workbox system developed by Sue Patrick for the past several years. I have to say that organizing our daily work has been a sanity saver for me. Put, the workbox system is a way to organize all of the daily school work for your student. You can use rolling carts, plastic crates, file folders, accordion files, or whatever else fits your needs.
See a workbox video tutorial here.
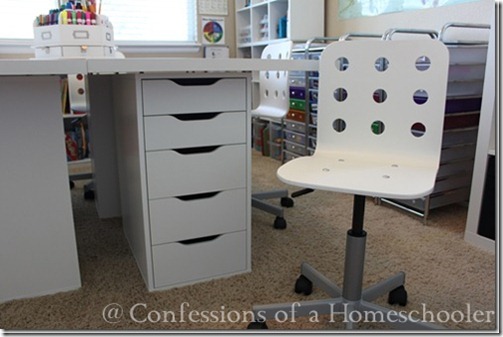
Here is a close up of my Vika Alex Drawer Units $79.00. There are only 5 drawers in these, so right now we’re putting two subjects in a couple of the bottom drawers.
Using this organizational system, you will keep everything needed for one subject into each drawer, file folder, or whatever organizer you choose. That way your student can easily see what they are to do each day. It helps students work independently as well as keeps everyone on track for the day. As the teacher you are responsible for re-filling the work each day so that it is ready to go.
This system has helped me stay organized during our hectic homeschooling day. This method also allows students to move through their work more independently. I can easily direct them to move on to another activity until I’m able to help them if needed. It also provides a visual for how much work they may have on any given day, how much they have accomplished, and how much left until they are finished. It’s also easier for me to see if someone skipped something, or didn’t do a lesson. You can see a workbox video tutorial of how we organize our school day for more details on using this type of organizational system.
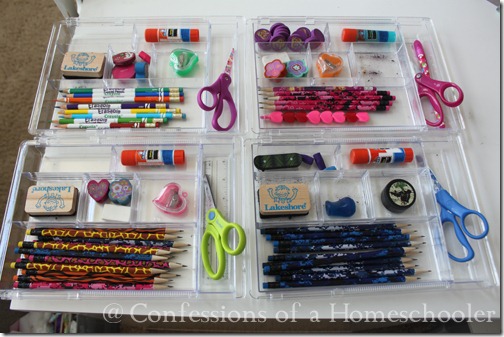
I also try to keep their supplies handy and organized so there isn’t a lot of people getting up to “get something.”
Each of my kiddos has an Expanding Acrylic Drawer Organizer in them with all of the supplies they’ll need. This keeps them from getting up a thousand times during class to get something!
Student Storage
- Completed School Work: You will need to find an easily accessible location for completed work. I use stacking paper files for this. For example in our homeschool, as students complete their work, I have them put it on my desk for grading. Once the work is graded, I pass it back to students to correct. Finally, we place completed and corrected work into each student’s file tray. I periodically clear out the tray and place the student work in a 3” 3-ring binder kept on my teacher’s shelves. This just stores completed work until our year is over and I move it to the basement into long term storage.
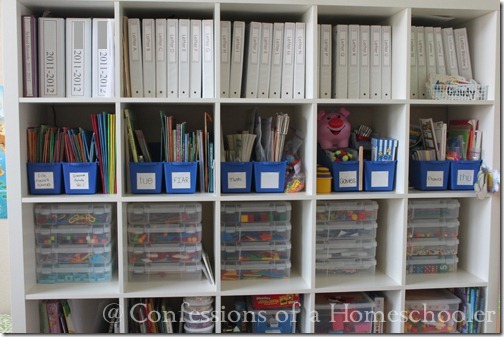
- Student Work Binders: I use 3” – 3 ring binders that we re-use for each child each year. It has dividers that separate each subject and I file our work in the binder as it’s completed; i.e.: create divider tabs for Math, Language, Phonics, Spelling, Art (I only keep stuff that fits), Science; Handwriting. The below binders are 3” binders, they store quite a bit of work. And I keep the current year’s binders on our shelves in our homeschool room for easy access. As my files fill up, I put the completed work in these binders until the year ends.
- Long Term Storage for Student Work: I like to keep bankers boxes in the basement for our long term storage. I keep one box per student, then band all of their work at the end of the year and place it in the banker box. This box is stored in our basement on shelving units. (See #9 below for more details on long term storage.)
Manipulatives
Store like things together. If you have younger students chances are you also have a ton of objects already that you can use for various activities. I try to store manipulatives together based on subject. For example store language/phonics things together, math things together, puzzles together, etc. Some ideas for storage:
- Small plastic containers (Take out side dish containers work well.)
- Plastic ZipLoc baggies
- Rubbermaid Tupperware dishes
Books
Books by Topic: Depending on your needs, I suggest storing books by topic. For example we store all of our holiday books together, then separated by holiday like: Christmas Books, Thanksgiving Books, Easter Books, etc. I also store them by subject as well.
Readers: Store readers by level. This makes it easier for your students to pick out a book that is appropriate for their age or reading level.
Technology
Most homeschools include some sort of technology. I have all of our ‘electronic’ items in one area. We keep a computer used for online education as well as our iPad on my desk. If possible make it so this area is ergonomically efficient for the ages of your students. Keeping electronics in one area helps you keep track of everything, and helps you to monitor its usage.
Wall Space
- Posters & Other Visuals: Keep visuals low enough for kids to see them easily. Having an alphabet strip up at the top of the room for a preschooler isn’t exactly effective. Use posters and other things relevant to what you are teaching, this will most likely change from year to year.
- Whiteboard: Most people will need some type of writing surface in their homeschool room. I recommend either a white board, or chalk board for this need. We use our whiteboard for almost everything. I also suggest getting one large enough to fit more information than you think you will need. We currently have a 5 ft. x 8 ft. white board which is almost always completely full of information on any given day.
- Colorful but Useful: Wall space is precious! Keep your wall space fun and colorful, but make sure that the materials are also useful. Some ideas: Calendar area, topical posters, maps, sight words, timelines, an alphabet strip, and a cork board to display completed student work.
Want more information? Check out Homeschooling 101: A guide to getting started!
If you’ve missed my previous posts make sure to check them out!



I am super impressed with your color coding and organization skills. Wow. I look around at the books laying in the floor and the papers stacked on top of the barbie house and I get all pumped about trying to organize and then it lasts for all of 5 minutes until my tiny toddler tornado descends upon the room. Great room, it truly looks amazing.
You school room is amazing. I found that my children preferred having just 1 box instead of many boxes, so we just used a box with a handle for each student. I would just pull out each day what I wanted them to work on and they just worked through their pile each day. Then I just had a folder on a bookshelf where I collected each student’s completed work. This was a more budget friendly option for us and caused less stress in the long run for your family. Thanks for sharing how you do things.
Thanks, Erica, for sharing all your expertise with us!
It is my understanding Ikea is discontinuing the large white bookcase you and so many other homeschoolers love. I always wanted one but it was already over my budget and a bit big for our space, so we use an oak bookcase (the sturdy stained plywood type often stained in “golden oak”) we found on craigslist for $20. The bonus is that it nearly matches the 2 bookcases we already have for our reading books. Since it doesn’t have the nice divided cubbies like the Ikea one, we use the Closetmaid canvas bins we already have plus some of the Sterilite small drawers. We have neutral bins for our general classroom materials, and each child is color coded with a bin of “while you are waiting” activities (toys for the youngest, manipulatives/drawing/etc for older) and also a bin each for “treasured items” (those special items siblings try to get into, but shouldn’t. This is mainly for the eldest since many items are breakable and/or choking hazards for the younger siblings). A bonus is adjustable height shelving, so from time to time we rearrange things a bit to allow for more/less reading books, or a small display shelf for a unit study or completed crafts which can’t be hung on a wall.
Your post has inspired me to try again to organize our “library.” With toddlers, it never stays organized. I even tried the white cardboard magazine holders from IKEA to group by subject but those have not been sturdy enough to endure toddlers. I think grouping by level might be brilliant, as each child would be assigned a specific area to pick from and also keep clean!
Thanks again!
How would the workbox system work for an almost high schooler?
Can we see a picture of your bookshelves? I don’t believe I’ve seen your library yet.