

Hey guys! As most of you know we participate in a Keeper’s At Home girls group and this month I’m teaching quilting. So I needed a fun and easy project that covered quilting basics, was beginner friendly, and that we’d be able to complete in one night.
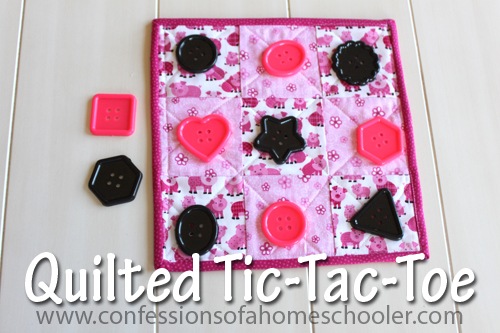
So we ended up making this really cute tic-tac-toe board. It takes about an hour and a half to complete, and uses minimal supplies.
This project is super beginner friendly, and teaches beginner quilting techniques all the way from piecing, quilting, and binding! So not only is it a great way to learn how to the basics, but you’ll end up with a fun project at the same time!

Supplies:
- 2 fat quarters (Pick two contrasting colors)
- 10.25” x 10.25” batting (I use Warm and White cotton batting for most of my projects)
- Spray Basting (I like 505 Temporary Fabric Adhesive)
- Buttons: 5 each of 2 different colors (You can really use anything you want as game pieces!)
- Rotary trimmer (I like this one: Olfa Splash 45mm Rotary Cutter)
- Self Healing Cutting Mat (I have a Fiskars 18”x24” light blue mat)
- Clear Acrylic Ruler
- Coordinating thread (I’m using Aurifil 50wt natural white)
- Straight pins (I like glass head straight pins)
- Sewing Machine
Cutting Instructions:
Cutting instructions for fat quarters are shown below. You do not have to use fat quarters, you’re welcome to use whatever fabric you have on hand, as long as you cut the specified pieces as listed below.
Fat Quarter 1:
- Cut 1 – 10.25” x 10.25” fabric piece (board backing)
- Cut 5 – 3.5” squares

Fat Quarter 2:
- Cut 2 – 2.25” x 22” strips (binding)
- Cut 4 – 3.5” squares
- Cut 1 – 2.25” x 11” strip (binding)

Batting:
Cut 1 – 10.25” x 10.25” square
Okay, now that your cutting is done you’re ready to go! Let’s get sewing! Watch my Quilted Tic-Tac-Toe video here!
I hope you enjoyed this project! If you are inspired to create something fun, make sure to post your pics and tag me on social media so I can see what you all create!
- Confessions on YouTube
- Confessions on Instagram
- Confessions on Facebook
- Confessions quilting ideas on Pinterest
Want more information on getting started quilting? Check out my Getting Started series!
Made this quilt piece over the past few days and SO APPRECIATED your detailed tutorial. It was my first time sewing, so really know nothing about it and couldn’t have done it without this step by step tutorial. Had some issues, it’s not perfect or quite as good looking as yours but will do another one. It’s a great practice project for new sewers, that’s for sure.
Again, thanks for putting this up. Very helpful!
I think this would be a great gift but with a few additions to make it a great travel/car game. You could add velcro dot to the center of each square with the opposite dot on the back side of each game piece. Then, you could add two lengths of ribbon to the top edge in the middle so you could tri-fold it and tie it up. Just my thoughts! Very cute idea and very beautifully executed!
I am a VERY beginner quilter and I loved making this little game for my son. It didn’t turn out perfect, but for my first time machine quilting and binding it worked out well. (But, not good enough to post on any pics 😜. ) Your instructions were so easy to follow. You have a talent for teaching. I love following your quilting posts. Thanks for sharing.
Oh good, I’m glad it was helpful!
hi Erica!
Thanks for the great Tutorial!
I am teaching a 3 day Mom&me sewing class at our local library next month and was wondering if using the tutorial for them would be ok? I need to print the instructions for the kids and we would also show it on the screen. I would be sure to add the link to your site for credit but want to make sure its ok with you. Thank you so much!
Hi! I’m a beginner and am going to give this a try. I noticed that you don’t necessarily back stitch on every square you make/sew. Is there a reason?
Hi! Yes, you don’t need to backstitch when quilting because your stitches get locked in place when you sew the blocks together, then finished when you bind your project.